The Foundation Lab: One Security Lab Environment on Apple Silicon
The shared base every lab in this portfolio builds on: UTM on an Apple Silicon Mac, an ARM-native Kali attacker, an Ubuntu Server box for the SIEM, x86 targets under emulation, an isolated network, and snapshots. Set it up once, then branch into any track.
- Platform
- Self-hosted
- Target
- Local VM lab
- Difficulty
- Easy
- OS
- Linux
- UTM
- QEMU
- Kali Linux
- Ubuntu Server
- virtualization
- networking
- lab-setup
- snapshots
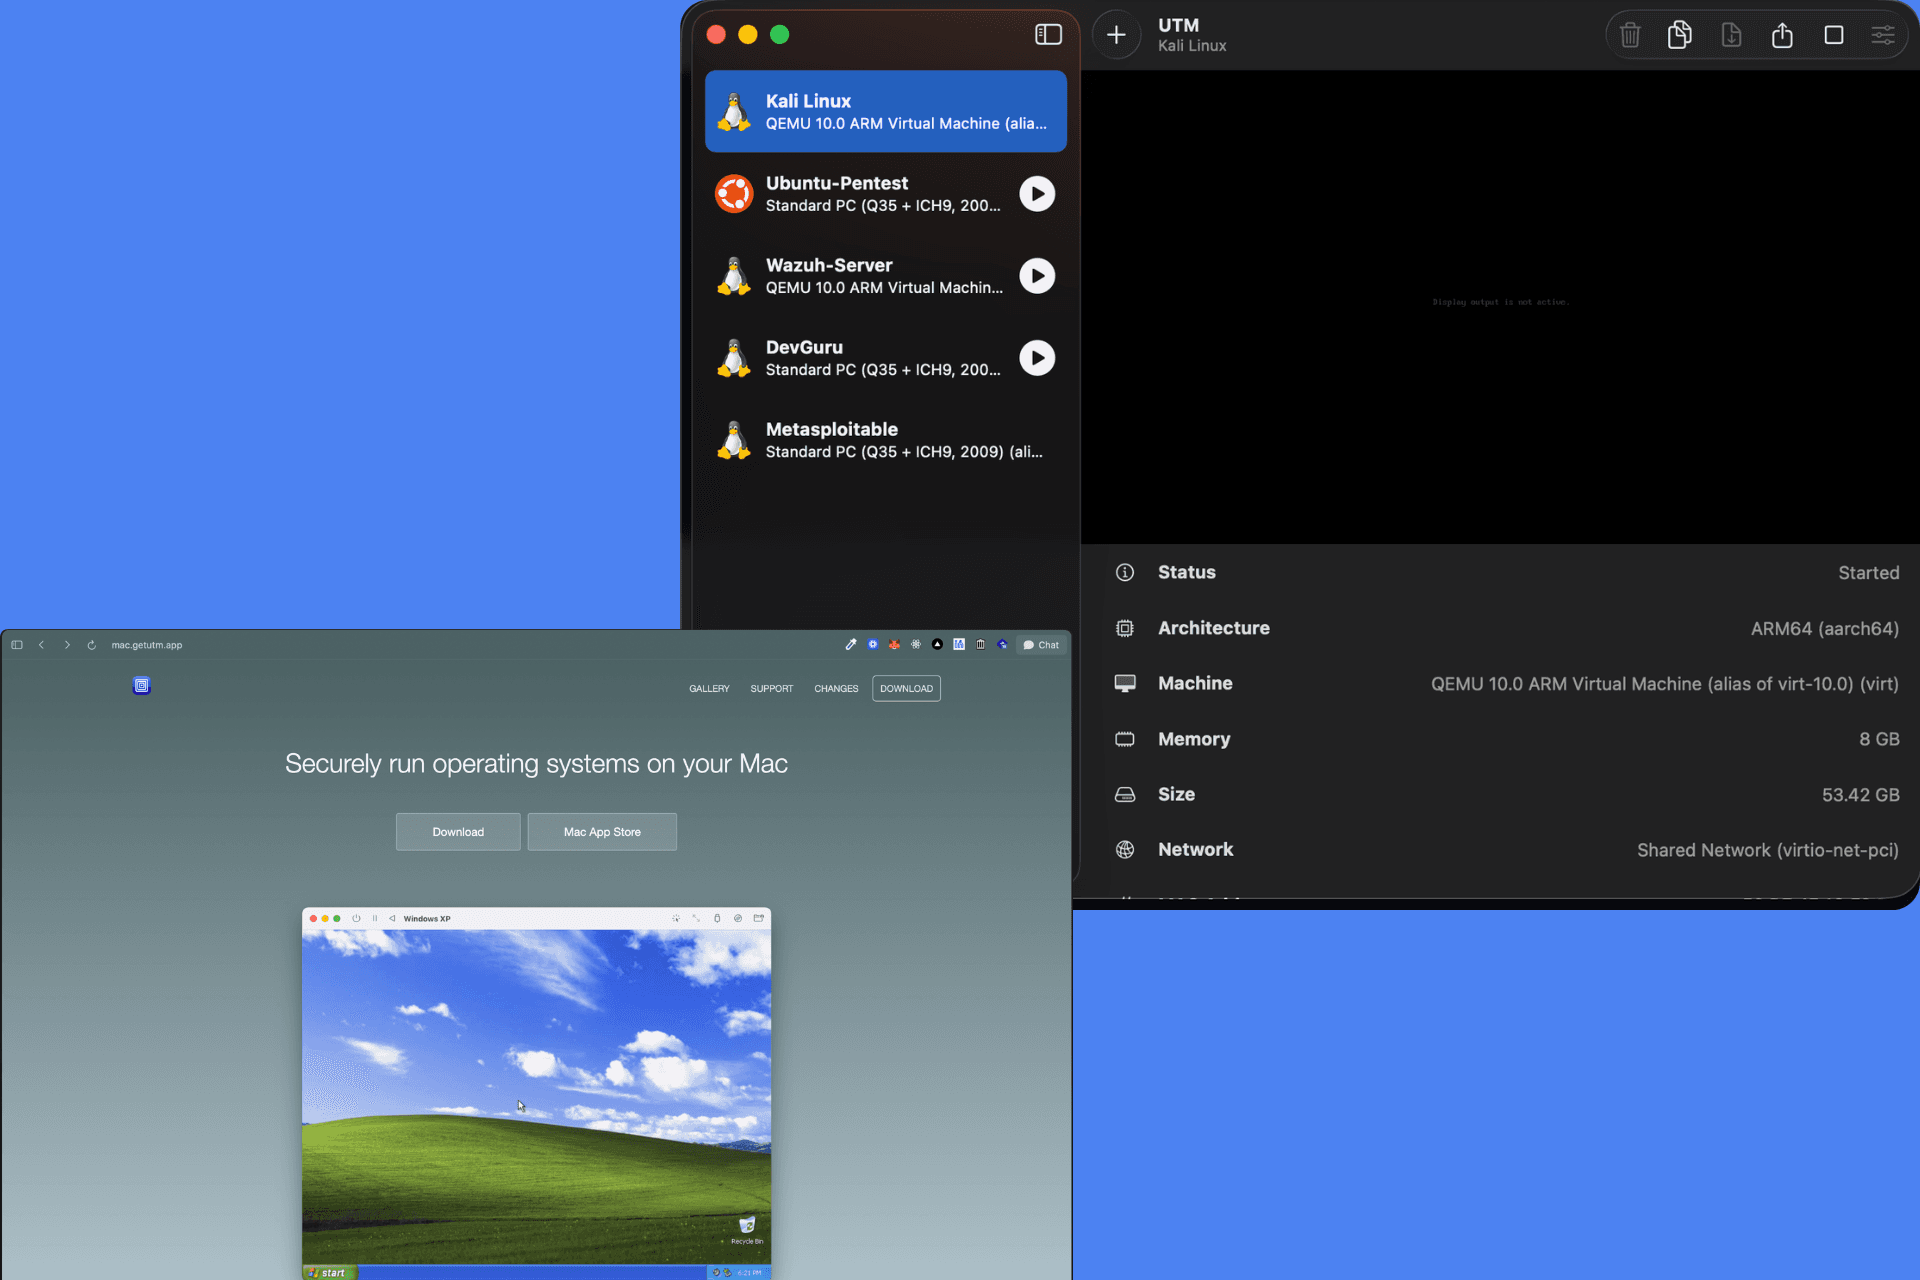
Every lab in this portfolio, offensive and defensive, runs on the same small set of virtual machines on a single Apple Silicon Mac. This guide stands that environment up once. Finish it and you have a working attacker box, a server for the detection stack, a pattern for adding vulnerable targets, and an isolated network for them to talk on. From here you branch into any track without rebuilding setup.
If you have already done the environment setup inside another lab, you can skip this one. It is the same ground, pulled out into its own place so the track guides can point here instead of repeating it.
Why this lab exists#
Most security lab guides assume an Intel machine running VirtualBox. On an Apple Silicon Mac they break at step one: VirtualBox cannot run x86 guests on ARM at all. Parallels (paid) and VMware Fusion (free for personal use) are more polished, but they virtualize rather than emulate, so regardless of cost neither can boot the old x86 systems most vulnerable VMs are built for.
The whole training ecosystem of intentionally vulnerable boxes is x86. The real problem on an ARM Mac is not the attacking, it is getting those targets to run at all. This foundation solves that with UTM, a free, open-source hypervisor that can both virtualize ARM-native guests at full speed and emulate x86 guests slowly but faithfully, on the same machine and the same isolated network. No paid software, no Intel hardware.
The one concept that makes this work#
UTM offers two ways to run a guest, and picking the wrong one means the VM will not boot. This single distinction governs every machine you add:
- Virtualize runs a guest on the Mac's own ARM CPU directly. Fast, near-native. Use it for anything ARM64: Kali, Ubuntu Server.
- Emulate translates another architecture instruction by instruction. Slower, but it runs x86 operating systems that have no ARM build. Use it for every VulnHub or Metasploitable-style target.
A plain rule to carry through the whole portfolio: ARM64 guest → Virtualize. x86 guest → Emulate. When a target download is an .ova, .vmdk, or an old ISO, it is almost always x86, so it is Emulate.
Lab architecture#
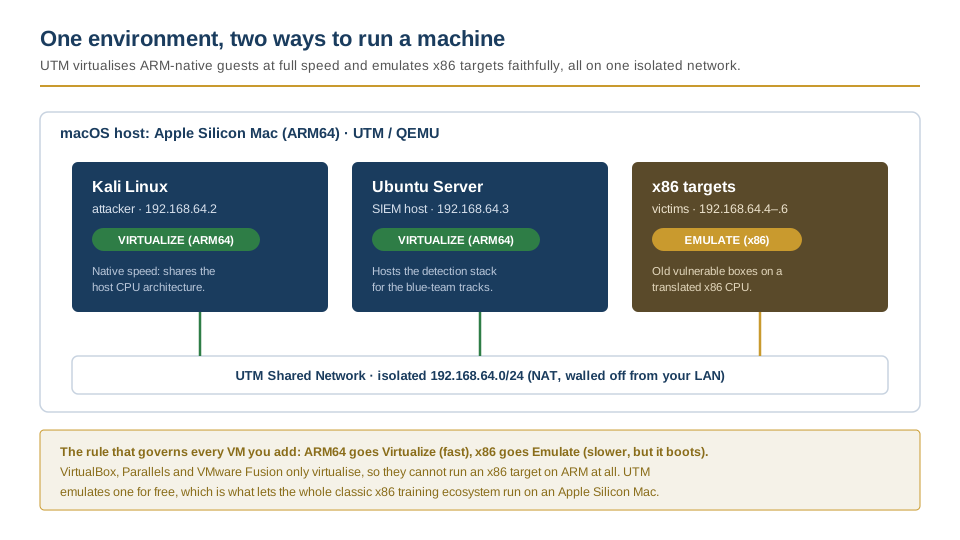
The addresses above are the convention this portfolio uses throughout. Yours may differ by a digit; what matters is that every VM sits on the same Shared Network.
Prerequisites#
| Requirement | Minimum | Recommended |
|---|---|---|
| Mac chip | Any Apple Silicon (M1+) | M2 Pro or later |
| RAM | 16 GB | 16 GB+ (you will run 2–3 VMs at once) |
| Storage | 80 GB free | 150 GB+ free |
| Software | UTM (free) | UTM + Homebrew |
| Network | Internet for downloads and feed syncs | Shared Network (default) |
Install qemu-img (used to convert target disks later):
brew install qemuWhy UTM and not something else#
| Hypervisor | Free? | Runs on Apple Silicon? | Can emulate x86? | Verdict |
|---|---|---|---|---|
| UTM | Yes | Yes (native) | Yes (QEMU backend) | The only free option that does both |
| VirtualBox | Yes | Partial (Dev Preview) | No | x86 VMs will not boot |
| VMware Fusion | Free tier | Yes | No | ARM guests only |
| Parallels | Paid (~$100/yr) | Yes | No | ARM guests only |
| Docker | Yes | Yes | N/A | Not a hypervisor, cannot run full OS VMs |
The tradeoff with UTM is speed: emulated x86 VMs run slower because every instruction is translated. For a security lab that is fine. You are running scans, shells, and log pipelines, not compiling kernels.
Install UTM: download from mac.getutm.app or the Mac App Store.
1. The Kali attacker VM (ARM64, Virtualize)#
Kali publishes an official ARM64 image, so this VM runs natively.
- Download the Kali Linux ARM64 installer from kali.org/get-kali (the Apple Silicon image).
- Open UTM → Create a New Virtual Machine → Virtualize (not Emulate).
- Configure:
- OS: Linux
- RAM: 4 GB minimum (6–8 GB if your Mac has 32 GB+)
- Storage: 40 GB (Kali plus tooling needs room)
- Network: Shared Network (critical, see section 4)
- Mount the ISO, boot, and run through the installer normally.
- Eject the ISO from VM settings afterward so it boots from disk.
Checkpoint: after first boot, open a terminal and run:
uname -mExpected output is aarch64. That confirms you are running native ARM, not emulation.
2. The Ubuntu Server VM (ARM64, Virtualize)#
This box becomes the host for the detection stack in the SIEM track (Wazuh manager, indexer, dashboard). It is ARM-native, so it also virtualizes. Build it now if you plan to do any blue-team work; skip it if you are only doing the pentest track for now.
- Download Ubuntu Server for ARM64 from ubuntu.com/download/server/arm.
- UTM → Create a New Virtual Machine → Virtualize.
- Configure:
- OS: Linux
- RAM: 6 GB (the SIEM's indexer is memory-hungry)
- Storage: 64 GB (log data grows)
- Network: Shared Network
- Run the guided installer. Create a user and enable OpenSSH when prompted so you can manage it from your Mac terminal.
Watch the disk sizing. UTM's guided Ubuntu install often assigns only about half the disk to the root volume through LVM, leaving the rest unallocated. Check right after install:
df -h /
lsblk
If / is far smaller than the disk you gave it, extend the logical volume into the free space:
sudo lvextend -l +100%FREE /dev/ubuntu-vg/ubuntu-lv
sudo resize2fs /dev/ubuntu-vg/ubuntu-lv
Checkpoint: df -h / now shows close to the full disk, and uname -m reports aarch64.
3. Adding x86 target VMs (Emulate)#
Vulnerable boxes ship as x86 disk images. The import workflow is the same for every one: convert the disk, create an emulated VM, and point it at the converted disk. Learn it once and you can bring in anything.
Example: Metasploitable 2
- Download the box (for example from vulnhub.com).
- Extract the
.vmdk, then convert it to QEMU's format:qemu-img convert -O qcow2 Metasploitable.vmdk Metasploitable.qcow2 - UTM → Create a New Virtual Machine → Emulate.
- Architecture: x86_64
- RAM: 512 MB–1 GB (these boxes are light)
- Do not check UEFI Boot. Old Linux images expect BIOS; UEFI drops you into a shell instead of booting.
- Instead of creating a new disk, import your
.qcow2as the drive. - Set the network to Shared Network, then boot.
If the screen says "Display output is not active": this is not a hang. Old kernels lack a driver for UTM's default display card. Shut down, go to Settings → Display, and switch the card to plain VGA.
Checkpoint: the target reaches its login banner. It does not need to log in to be useful; many lab targets are attacked over the network only.
4. Networking: the Shared Network#
Every lab VM must be on the same UTM network mode to see the others. Use Shared Network for all of them.
| Mode | What it does | Use it? |
|---|---|---|
| Shared Network | All VMs get IPs on the same 192.168.64.0/24 subnet, NAT'd through the Mac | Yes, use this |
| Bridged | Puts the VM on your real LAN | No, this exposes deliberately vulnerable boxes to your real network |
| Host Only | Isolates VMs; VM-to-VM access needs a shared host network with manually assigned IPs | Not covered here |
"Isolated" means isolated from your LAN, not air-gapped. Shared Network is NAT: your VMs cannot be reached inbound from your real network, but they can reach the internet outbound through the Mac. That path is what Kali and the Ubuntu Server box need for updates and feed syncs, which is why the labs use it. It does mean a vulnerable target has internet while it runs, so power targets off when you are not using them. Fully air-gapping the targets while keeping them reachable from Kali is possible but fiddly here (it needs a shared host network with manually assigned IPs) and is not covered in this guide; for the lab, Shared Network plus powering targets off when idle is the pragmatic balance.
Confirm connectivity after booting two VMs:
# From Kali
ip addr show        # note Kali's IP, e.g. 192.168.64.2
ping 192.168.64.x   # the target's IP; find it with ip addr on the target VM
Checkpoint: you get ping replies. If not, confirm both VMs are set to Shared Network and check each one's actual IP with ip addr.
5. RAM budget#
On a 16 GB Mac you cannot run everything at once. Plan sessions around what a task needs:
| Session | What is running | Approx. RAM |
|---|---|---|
| Pentest | Kali (4 GB) + 1 target (1 GB) | ~5 GB |
| Detection | Kali (4 GB) + Ubuntu Server (6 GB) + 1 target (1 GB) | ~11 GB |
| Multi-target | Kali (4 GB) + 2 targets (1 GB each) | ~6 GB |
Rule of thumb: Kali plus the SIEM server plus one target is the comfortable ceiling on 16 GB. A second target on top of that gets tight. Running every VM at once will swap and crawl.
6. Snapshots, before you break anything#
UTM has no built-in snapshot GUI. Two reliable options:
Option A, file-level copy (simplest):
- Shut the VM down.
- In Finder, open
~/Library/Containers/com.utmapp.UTM/Data/Documents/. - Duplicate the whole
.utmbundle and rename the copy (for exampleMetasploitable-clean.utm).
Option B, QEMU snapshot (lighter):
# VM must be stopped for both commands
qemu-img snapshot -c clean-install /path/to/disk.qcow2   # create
qemu-img snapshot -a clean-install /path/to/disk.qcow2   # restore (apply)
qemu-img snapshot -l /path/to/disk.qcow2                 # list snapshots
Do this while each box is clean, before any exploitation or configuration changes. A clean snapshot is what lets you reset a target to a known state: after a run, stop the VM and apply the snapshot with -a to roll it back.
Connecting to old targets over SSH#
The older x86 boxes run SSH versions whose key-exchange and host-key algorithms modern OpenSSH refuses by default. Re-enable exactly the ones a given target needs when you connect from Kali:
ssh -oHostKeyAlgorithms=+ssh-rsa -oPubkeyAcceptedAlgorithms=+ssh-rsa user@192.168.64.xAdd only what the handshake error asks for. Do not re-enable ssh-dss; newer OpenSSH removed it for good reason, and no lab target here needs it.
Where to go next#
The environment is now the shared base for every track. You do not need all the VMs for every one, so build what a track needs when you need it. This is the hub; each track below is a spoke. See how they connect on the interactive labs map, or jump straight in:
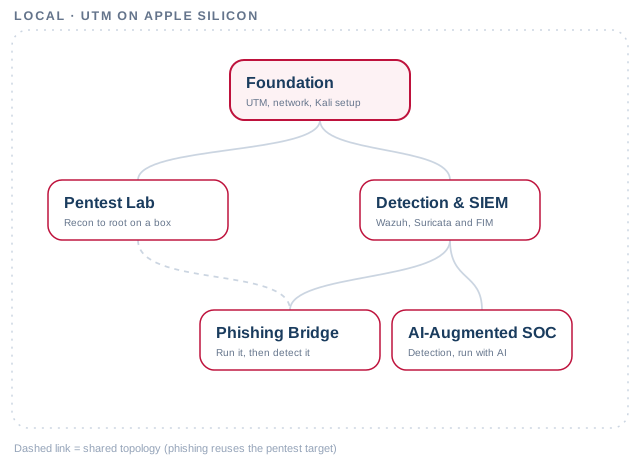
- Pentest track: recon to root against the x86 targets, two independent paths, every offensive step paired with the control that stops it. Uses Kali and the targets. (Published.)
- Detection & SIEM track: stand up Wazuh on the Ubuntu Server box, ship agent and network logs, and catch the attacks from the pentest track. Adds the server. (Published.)
- Phishing bridge: run a campaign and build the detection for it in one exercise. Uses both. (Planned.)
- AI-augmented SOC: layer network inventory, dashboards, and AI triage on top of the detection stack. (Planned.)
Each track guide opens with a short foundation checklist that links back here, so you never lose your place in it.
Appendix A: Troubleshooting reference#
| Symptom | Cause | Fix |
|---|---|---|
| x86 VM won't boot, lands in a UEFI shell | Old image expects BIOS | Uncheck QEMU → UEFI Boot |
| "Display output is not active" on an old guest | No driver for UTM's default display card | Switch the display card to plain VGA |
| Root filesystem much smaller than the disk | LVM guided-install only claimed part of it | lvextend -l +100%FREE then resize2fs |
| VMs cannot ping each other | Mixed or wrong network modes | Put every VM on the same Shared Network |
| A vulnerable box has internet you did not want | Shared Network is NAT, not air-gapped | Power targets off when idle, or move them to Host Only |
| SSH to an old target is refused | Modern OpenSSH drops legacy algorithms | Add -oHostKeyAlgorithms=+ssh-rsa -oPubkeyAcceptedAlgorithms=+ssh-rsa |
| An ARM guest runs slowly | Accidentally created in Emulate mode | Rebuild it as Virtualize |
Appendix B: VM quick reference#
| VM | Role | Arch / UTM mode | Suggested IP | RAM |
|---|---|---|---|---|
| Kali Linux | Attacker | ARM64 / Virtualize | 192.168.64.2 | 4 GB |
| Ubuntu Server | SIEM host | ARM64 / Virtualize | 192.168.64.3 | 6 GB |
| x86 target(s) | Victim | x86_64 / Emulate | 192.168.64.4–.6 | 0.5–1 GB |
Lab status#
The foundation environment is built and in daily use across the tracks in this portfolio. The pentest track runs on it today; the detection track is next, and it reuses the Ubuntu Server box set up here rather than standing up anything new.